The Ultimate Guide to Optimizing Images for Site Speed & SEO

February 18, 2015

The Effect of Load Speed on Conversions
Consider the impact of a slow website for a moment. Research by Ian Laurie's agency, Portent, shows that 40% of desktop visitors leave a site if it isn't visually loaded in 3 seconds. Worse yet, 44% of e-commerce visitors will bounce AND complain to a friend of the experience.
As a lead generation agency, TSL puts a considerable effort into creating lead generating inbound marketing campaigns. And we've found that the easiest way to alienate a visitor is to have a landing page that loads slowly.
But our findings certainly are not special, nor are they new. Multiple studies have proven that as load time increases, revenue decreases. For example one study found that every second after the first 2 caused:
- The conversion rate to decrease by 7%
- Customer satisfaction to plummet 16%
- And the average sale to decrease by 11%
(Download the study as a pdf to read more)
You’ve probably heard of the Amazon study, which detailed how changing load time by 100 milliseconds resulted in a change in annual revenue by 1%.
Although 1% seems like a modest change in conversion rate, small and medium sized businesses notice. For a small business, like Brookdale Senior Living, recorded a 3.92% jump in conversion rate, which netted a "modest" $106,000 increase in revenue.
The Impact of Load Time on Organic Ranking
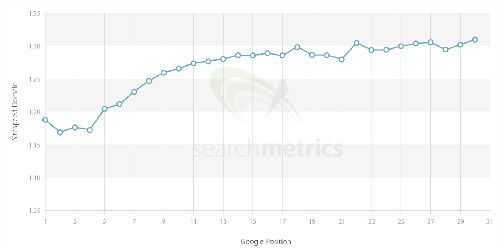
Searchmetrics released their 2014 report that chronicles their multiyear case study about factors influencing rank in search results. Most notable is the correlation between load time and rank. They found that exclusively the top ranking pages load "significantly faster than the rest". The average load time of a domain in the top 30 positions is 1.27 seconds.

Searchmetrics graph image
At this point, I bet you’re wondering how fast your site loads. Take a minute to check how optimized your webpage is with PageSpeed Insights; we’ll wait. Or if you’d prefer deeper insight use; webpagetest.org for site speed.
Keep in mind that the time of day will impact the results; the middle of a business day usually means more traffic to a hosting server, causing a slower time-to-first-byte by the server. Conversely, the middle of the night means less traffic on a server and so a website hosted on the given server will load more quickly.
Let’s talk about the easiest, least technical way of decreasing that load time.
Speed Up the Site with Progressive Images
Have you ever wondered how sites that have beautiful, full width, hi-resolution images still load quickly?

First, they're likely using a content delivery network (CDN), which is a little too technical for this post. However, we will visit ways to improve site speed on a deeper level in a later post. Sign up to receive updates about our posts so you don’t miss it.
The second and most underused method of speeding up your site is the use of progressive images.
What’s a Progressive Image?
A progressive image is a single image file that will progressively increase in resolution as the page loads. It's like multiple images are stacked together, the bottom image would be the lowest resolution and the top image would be the highest resolution. When a server calls for a progressive image it loads the bottom layer first, which is the smallest image in the stack. Once other page elements (such as the style sheets, tracking codes, etc.) are done loading then the progressive image continues adding images to the stack, one on top of the other, each a higher resolution and than the previous.
This method of loading an image makes it appear as though the site is loading quickly.
This process goes unnoticed by visitors because the eye is scanning other elements of the page and doesn’t notice imperfections at first glance. When the visitor takes a second look at the progressive image the highest resolution version is usually loaded, giving the appearance of a fast loading, hi-res image.
Creating a Progressive Image
Using "Save To Web" in Photoshop
There are various tools online that will automate the process of creating progressive images; however, we don’t recommend them because all too often the site will embed meta data that increases the image size.
An easy way to create a progressive image is with Photoshop. The process is simple. Using the 'Save to Web' option will also decrease the size of your image. It’s not perfect, but you will notice a difference. Let’s make the file even smaller.

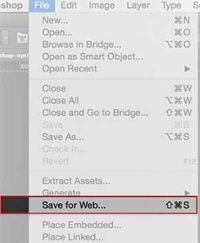
- In the menu, click 'File' and then 'Save to Web'
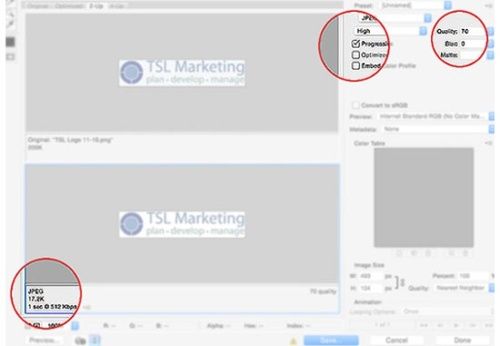
- An interface will now open to further optimize the image
- In the top right corner you can select the file type. Choose "JPEG".
- Next, check the box next to the words "Progressive".
- And finally, save your file.
No that we've covered the initial steps, let's take it a step further and decrease the file size.
Decreasing the Image File Size
- In the menu, click 'Image' and scroll down to 'Image Size'
- Make sure the units are set to pixels, then adjust the image dimensions to the minimum size necessary for the required purpose.
If you want a full width image, then 1400px wide is sufficient. A width of 350px is usually good for images that will be placed in the body of your page.
- Now return to the 'Save to Web' interface (same process as above)
- In the top right corner, you will see "Quality" beside a number. Set this number in the range of 35-65.
The quality setting is on a scale of 1-100. The higher the number, the higher the resolution of the image and the larger the file size. Use the slider to experiment with the quality of the image. It is a good idea to visually see the difference between a quality of 1 and a quality of 100. To see the difference between your optimized image and the image at 100 quality, click the "2-Up" tab in the top left corner of the interface.
Wrap up by previewing the image in the middle of the screen while adjusting the quality to a point that you’re happy with. - The bottom left corner of the interface will tell you the size of the image in KB. As a general rule, you want to keep web pages under 500 KB. (Remember the Searchmetrics findings above?)
- Save your image.

SEO Tip: The filename should not include any capital letters, spaces, or underscores. Use dashes in place of spaces. And include a keyword relevant to the web page where the image will be placed, while still naming it accurately based on the image. For example, an image on this blog could be something like, optimized-progressive-image-example.jpg.
Use CSS Sprites to Decrease Server Requests
This technique is all about grouping various images into a single file. Then positioning each image using CSS. It’s called CSS Sprites.
  .icon-foo {

    background-image:url('sprites1.png');

    background-position:5px 5px;

  }
CSS sprites are multiple images that are aggregated into one file and use CSS to map out which part of the image file is shown on page. CSS sprites typically enable the web server to both serve fewer HTTP requests and download fewer kilobytes of content, which are both good for page load speed considerations. However, it also eliminates the SEO value of a keyword-rich file names and the ability to add "alt text" to the image. Use CSS sprites for image-based web controls, icons, and other visual elements on the page that are specifically not content images.
When using your sprite, avoid leaving too much white space between images. This won't affect the size of the file, but will have an effect on memory consumption.
And despite nearly most website developers and many graphic designers knowing about sprites, this technique isn't widely used—perhaps due to developers not using automated tools to generate sprites. Learn how to create sprites from W3.
Tools to Create CSS Sprites
This sprite generator from Dan's Tools get's the job done.
And this sprite generator by iconizr.com is very nice if you're ready to create .svg sprites. We'll cover SVG objects more below. Finally, for the developers out there, Spritemapper has been favorably received -- although I've never used it (I'm more on the digital marketing side of things).
Quick Recap
We’ve explained how to optimize images within Photoshop and similar tools. And we’ve explained how to make use of CSS sprites for icons that are small.
Next, let’s look at the best option for integrating scalable icons and vector graphics.
SVG Objects Instead of PNG Raster Images
Understanding the Difference Between Raster Graphics and SVG
Raster graphics are built with pixels. The file size of the image is based on the number of pixels within, or the resolution. The quality of the image is resolution dependent, so a high resolution image will have a larger file size than a low-resolution image. When an image is scaled larger than it’s intended pixel per square inch resolution then it becomes pixelated, like in the image below.
![]()
Additionally, when a raster graphic is loaded on a website, the server requests that the image be served. When a server is slow, then the load time of the site slows down. And once a raster graphic is uploaded to a site, the image cannot be edited except off-site, and it must then be uploaded again.
The Benefits of SVG Objects
Scalable vector graphics (SVG) are essentially code embedded into the HTML in XML format. Maybe that’s a little confusing. To simplify, these graphics are not files at all. They are code.
SVG objects are scalable to any size because they do not use pixels like raster graphics. The code updates to reflect the size of the image and thus, they will never appear distorted. To be more technical, the graphic (svg) is expressed with a mathematical equation that makes it scalable.
Remember the CSS sprite file with the social media icons above? Here is an example of those social media icons as an SVG object, not a JPG, PNG, BMP, or GIF file.
Note: You can see the difference between the two social media images by zooming in with your browser - think 200% or more. The first set of icons appear pixelated, while the second set do not.
SVG objects don't need to make a request from the host server because they are XML and can be directly embedded into the HTML of a web page. The result is a faster load time because there are fewer server requests. But you're not out of luck if you link to the svg as an image instead of embedding it in the html. SVG files can easily be 1/10 the size of png images, their transparent-background counterpart and retain near-perfect resolution at any size.
Moreover, if you want to edit the background color of an SVG object or change its color, you can make those changes within the HTML while the site is live.
And possibly one of the most underutilized benefits of SVG objects is that they can be animated with JavaScript or jQuery animation elements.
Minifying and Optimizing SVGs
There is a drawback of SVG objects though. The file size is based on the number of vector points. A graphic with a high number of vector points will result in a long series of XML code as each point is plotted with a series of numbers.
Think of it like marking points on a map with longitude and latitude. The more locations you mark on a map, the more numbers are necessary to define the longitude and latitude of those locations. Vector graphics are the same in that each point of a vector graphic requires something like longitude and latitude numbers.
More points mean more numbers to plot, a longer string of code, and more data that needs to be processed by a browser to accurately display the graphic. Meaning a technical object, such as text, will be result in a larger file size than something simple like a circle. To see the number of vector points or to create an SVG object, use graphic software like Adobe Illustrator.
To optimize the size of your svg in bytes, I'd recommend using this tool by Jake Archibald
For these reasons, SVG objects are ideal for icons of low complexity. You can learn more about SVG objects and how to create them from svgpocketguide.com.
Tools to Help Optimize
Here's a short list of some of my favorite tools for optimizing images on the fly:
- I already mentioned the tool by Jake Archibald a few sentences earlier.
- Gift of Speed's JPG Compressor is solid, as is their PNG Compressor
- Kraken.io's Web Interface is decent for groups of images under 1 MB each. If you have a dozen or so, just drag and drop them, then download the .zip file.
- JPillora's Base64 Encoder does a good job performing a task we didn't talk about much - creating Base64 images.
- b64.io also has a solid engine behind their Base64 encoder.
Pulling It All Together
Websites are larger because they're serving high-res images and search engines value fast websites more today than ever. The importance of optimizing your images can’t be overstated. Low quality and slow loading images are an easy way to alienate your visitor and search engines.
OK, I want you to do one last thing.
Compare your site to that of a trusted brand from the same vertical. Chances are that the trusted brand’s site has images that are beautiful and load quickly. That’s what visitors expect, and that’s what search engines expect. How does your site compare?
Optimized images and sites that load quickly have been proven to increase conversions and position in SERP. For a strong image optimization checklist, visit Google’s developers site.
If you would like help, get in touch with TSL Marketing. Our seasoned team of designers, developers, copywriters, and digital marketers take pride in our jobs. We’ve worked with some of the largest companies around world. Most importantly, our goal is to wow all of our customers.
Comments